A Pattern for Websockets in Python
This post is part of a series of articles on the infrastructure underlying cesium. Please send us your feedback in the comments section below.
Motivation
Traditionally, web frontends communicate with backends via API
requests. For example, to add a new user, the frontend would make an
asynchronous Javascript (AJAX) POST to /create_user. The request
returns with a status and some data, which the frontend relays to the
user as appropriate.
These types of calls are designed for short-lived request-answer sessions: the answer has to come back before the connection times out, otherwise the frontend is responsible for implementing logic for recovery. When the backend has to deal with a longer running task, the frontend typically polls repeatedly to see when it is done.
Another common scenario is one where the server wants to push updates through to clients as they become available. E.g., the server may scan a news resource once an hour, and then publish the results to all connected clients. The traditional solution is to either use long polling or SSEs.
Both of the above situations can be handled gracefully using WebSockets—the caveat being that these can be intimidating to set up, especially in Python.
This article presents a simple recipe for adding WebSocket support to your Python web server. It works with any WSGI server (Flask, Django, Pylons, etc.), and allows scaling up as demand increases. The full source code is available online at https://github.com/cesium-ml/message_flow.
Our end goal is to provide a pattern through which implementation of a data flow model such as Flux becomes trivial. Information always flows in one direction: from frontend to backend via API calls, and from backend to frontend via WebSocket communication.
Building blocks
The following diagram shows the different components of the system:
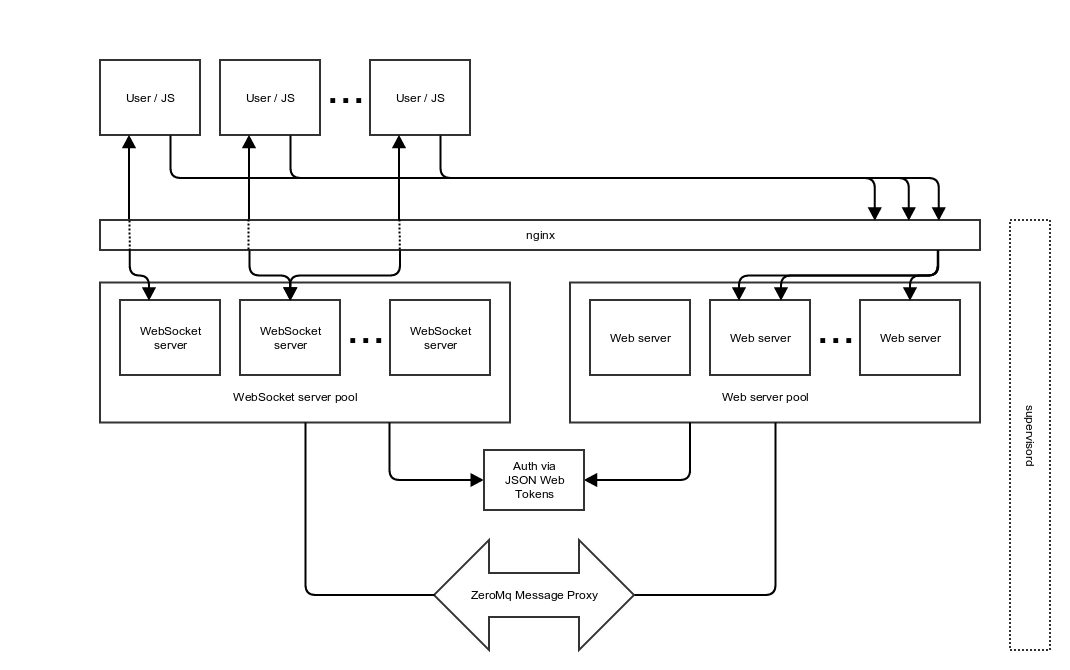
There are two primary server pools: web servers, and web socket servers. The web servers can be any WSGI compatible server, e.g. Flask, Django, Pyramid, etc. The WebSocket server consists of 105 lines of code, and runs on top of Tornado’s WebSocket implementation.
We run both these services behind an
nginx proxy, which redirects
any requests to /websocket to the WebSocket pool and the rest to the
Flask app (running on a Unix socket).
To allow communication between web servers and WebSocket servers, a ZeroMq XPUB-XSUB pipeline is established (this is a very simple form of a message broker, and comprises a mere 20 lines of code).
The frontend connects to the backend using a reconnecting WebSocket. To ensure that users cannot listen to one another’s communications, each frontend client receives a JSON Web Token. This token is then sent to the WebSocket for authentication. This logic requires about 80 lines of JavaScript and 3 lines of Python.
To keep the different micro-services up and running, we use Supervisor.
As you can see, each individual component is
- extremely simple and
- does only the one thing it was designed for.
Debugging is easy: all log files are saved together in ./log.
Horizontal scaling is a only matter of launching more servers. This is true for all services except the current message proxy implementation, which can easily be replaced with RabbitMQ.
Technical lessons learnt
There are a few technical gotchas to be aware of when implementing this pattern:
-
Behind nginx, open connections time out after one minute. We send heartbeat packets every 45 seconds to keep the connection open.
-
Supervisord has not been released for Python 3 yet. This is not a problem, since we’re only using it as a process controller. Just launch it using Python 2 irrespective of the version used for the rest of your code.
-
Python tasks do not always flush output to standard out rapidly enough for it to be caught in log files. In our
supervisord.conf, we setPYTHONBUFFERED=1to make sure our log files are filled. -
Not all systems allow opening Unix sockets in arbitrary locations.
Adopting this pattern
Try our example application or adopt this pattern in your own code as follows:
- Modify your existing web application to have an API endpoint
/socket_auth_token. This endpoint should return:
jwt.encode({'username': get_username()}, app_secret_key)
- Include
reconnecting-websocketandwebsocket.js(from our repository) in your HTML header:
<script src="https://cdnjs.cloudflare.com/ajax/libs/reconnecting-websocket/1.0.0/reconnecting-websocket.min.js"></script>
<script src="/static/js/websocket.js"></script>
- Modify your landing page to have
connectedandauthenticateddivs:
<ul>
  <li><b>WebSocket Connection: </b><span id="connected">Offline</span></li>
  <li><b>WebSocket Authenticated: </b><span id="authenticated">No</span></li>
</ul>
- Implement a basic event handler in your landing page to take care of incoming messages on the WebSocket:
<script type="text/javascript">
  function messageHandler(data) {
    switch (data["id"]) {
      case "EXAMPLE ID":
        /* Do something when a message with "EXAMPLE ID" arrives */
        console.log('EXAMPLE ID spotted');
        break;
      default:
        console.log('Unknown message ' + JSON.stringify(data) + ' arrived');
      }
  };
</script>
And hook it up:
<script type="text/javascript">
  $(document).ready(function() {
    ws = createSocket("ws://" + {{ request.host|tojson|safe }} + "/websocket",
                      messageHandler
    );
  }
<script type="text/javascript">
-
Messages are relayed to the frontend by publishing them onto the message queue.
-
Copy the following services and config files from our repository:
- Makefile
- supervisord.conf
- nginx.conf
- message_proxy.py
- websocket_server.py
Edit supervisord.conf to launch your webapp on run/flask_app.sock.
- Launch!
Type make and watch the fireworks.
Future work
Our next goal is to implement syncing of frontend and backend state, with the ultimate purpose of implementing Flux with React components. This is easy in Javascript with isomorphic applications, but harder when the backend is running Python.
Please let us know what you think of this pattern in the comments section below. We’d love to learn how to do it better!